The Samsung Galaxy S2 sports a very nice 8MP camera, and a front facing 2MP one as well for video calling and checking if you have something in your teeth :)
The only lacking thing is a dedicated shutter button to take the photos with, but that's not a big problem luckily.
Here is a breakdown of all the features and settings for the camera on the Galaxy S2:
When starting the default camera app on the phone, which only takes a second or two, you'll see most of the screen is used for the actual scene you're pointing the phone's camera at, with a view settings buttons on either side. See the screen shot below:
(Oh, just so you know, taking a screen shot (see how
here) while the camera is active, doesn't capture what you're seeing on the screen, it produces a black image like above as you can see)
Anyway, at the top you'll see three buttons, the first one opening up the settings screen, the second one setting the flash options and the third one is used to switch between the rear and front cameras.
At the bottom, on the left, is a thumbnail of the last picture you took, in the middle is the shutter button, and on the right is a switch button that switches between the still camera, or the video recorder.
Firstly, the settings. There are quite a lot of different settings for the camera, including stuff like the resolution, white balance, ISO, etc. Here are a few screen shots with all the settings you can set with the phone:
Starting at the top, you have "Self Shot" - this simply switches the cameras, which will allow you to take a picture of yourself (or to check your teeth).
Next you have the "Flash" button, which allows for three different settings - Flash Off, Flash On, or Auto - this is self-explanatory. The Flash button at the top of the screen also gives you the same options, which is quite convenient.
The third option is "Shooting Mode", which gives you, yup, you guessed it, a few different shooting mode to choose from, see below for the list: (I'll post some shots once I've played around with these a bit more...)
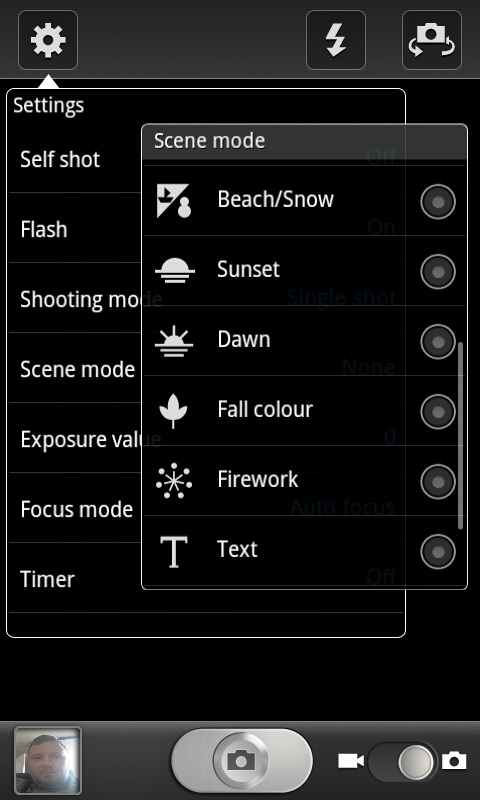
The fourth option gives you access to various "Scene Modes" - handy for stuff like Fireworks, Text, Beach shots, etc. Again, I haven't tried them all out, will post some shots as I get them:
The next option, "Exposure Value" allows you to manually set the exposure of your pictures, making them either brighter or darker...
The "Focus Mode" feature gives you three options, namely Auto Focus, Macro or Face Detection. Mine has been on Auto Focus the whole time, which works fine. When you want to focus on something specific, simply tap the screen there.
"Timer" does what is expected, putting in a delay to when the photo is taken - four options: Off, 2 Sec Delay, 5 Sec Delay and 10 Sec Delay.
The next one is "Effects", which gives you four options once again - None, Negative, Grayscale and Sepia - everyone knows these...
Then we have "Resolution", which, like with normal digital cameras, allows you to change the size of the resulting pictures you're taking. There's quite a few options:
- 8M 3264x2448
- W6.5M 3264x1968 (Wide resolution)
- 3.2M 2048x1536 (this should be fine for regular 4x6 prints...)
- W2.4M 2048x1232
- W0.4M 800x480
- 0.3M 640x480
Obviously, the higher the resolution, the bigger the files will be, but the more detail you'll be able to see when zooming in. I like high res photos, so I'll always have it on the 8MP setting...
"White Balance" is also a pretty standard camera feature, allowing you to set the temperature of the ambient lighting. There are 5 options - AWB (Auto White Balance), Daylight, Cloudy, Incandescent and Fluorescent.
"ISO" is something you'd set when taking low light shots. The higher you set the number, the less light there needs to be to get a descent exposure. But, keep in mind, the higher you set the ISO, the more noise your picture will have (which sometimes can be a desired effect!) - values are: Auto, 100, 200, 400 and 800. Not bad!
"Metering" gives you three options for your metering mode - Centre-weighted, Spot and Matrix.
"Outdoor visibility" ups the contrast of the screen, which allows you to see the screen a bit better when you're outside.
"Anti-shake" is pretty self-explanatory as well...
"Auto contrast" also self-explanatory - I haven't played around with this, but I assume the software then automatically adjusts the picture you've taken to have a higher contrast... Will let you know.
"Blink detection" - handy for when taking pictures of people, especially if they blink - this little feature will then wait a split second for the subject to open their eyes again :)
"Guidelines" - this features gives you the famous 3x3 grid on the screen, which helps with your shot composure.
"Review" - I haven't used this yet, but I assume that after taking a shot, it shows you a review of the pic first, which you must save or discard...
The third last option is "Image quality" - this has three values: Superfine, Fine and Normal - Mine will always stay on Superfine :)
Next is "Storage" - you can choose where your photos will be saved.
And lastly we have "Reset", which allows you to reset the camera settings.
This is quite a big list of settings and features, and more than enough for some decent photo taking I would reckon!
As time goes by, I'll add some of the photos I take to this blog, and you can see some samples of it's capabilities.
Till next time!